- It works™ 😉 (even on High Sierra!)
The Goal
I have:
- A MacBook Air
- a portable USB 3.0 external 1TB disk because I’m space constrained on my 128 GB machine
- 2 external 1TB platters on my desk connected to a USB hub
What I wanted (it works):
- All important documents, data, pictures, videos on ZFS
- separate snapshotting for different folders (e.g. a lot of datasets, more on why later)
- automatic backups via snapshots, redundancy in case of data corruption (happened before, saved my bacon a couple of times already)
- independent monitoring of the backup system („is this darn thing actually doing what it’s supposed to do? 🤔„)
What I got:
- Important and compressible data on ZFS
- internal pool:
- Mail (super nice due to compression and big space savings (in my case 20% reduction of space needed)
- Documents
- Downloads folder
- a second „Applicationz“ folder (complenenting /Applications with a zfs based one and with compression, resulting in space savings on my machine of 40%)
- music
- external portable platter:
- photos library
- movies/videos/Final Cut Pro X projects
- mirrored 1TB backup pool
- all datasets from internal and portable pool snapshotted and saved as a backup with redundancy
Enough of the talk, how does it look?
DISCLAIMER: If you are in no way familiar or comfortable with the Terminal, this is not for you.
My menubar: 
The ZFS relevant part is:  – Let’s start from right to left
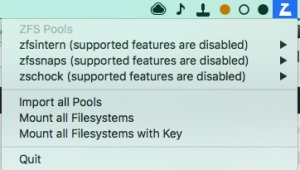
- The Z is the icon for ZetaWatch, a tool to quickly see which pools are attached, their status, datasets and it also notifies if there are errors detected! 👍🏼
- The 3 dots are 3 instances of AnyBar, to visually and in the most subtle way notify me of the status of snapshotting regarding the pools. I have 3 pools (remember internal, 1TB portable and 1TB mirror), right now according to ZetaWatch all 3 pools are imported but snapshots aren’t new enough on the two other pools (hollow and yellow) to be considered bona fide.
- The little stamp symbol is from LaunchControl, which allows me to quickly import and export pools with 2 clicks instead of going to the terminal and entering my master password all the time. You will only need this if you import and export one or more pools very regularly. If you have a Mac Pro with all disks attached all the time, skip the Bonus part at the end. I still recommend LaunchControl to setup launchd.
And finally when the dust all settled, and I know everything works as expected and shapshots are up to date, it looks like this: 
How do I tell the three dots apart? I launch them in sequence so I know which one represents which one by the order but they also listen on different ports: 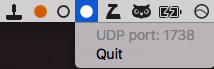
Ok, how do I get started?
- Install the latest release of OpenZFS on OS X from the O3X Download Website
- Install znapzend (I recommend the route through homebrew.
brew install znapzend
- If you know how to operate with launchd yourself, go ahead, if you’re like me, you’ll want LaunchControl
- Install AnyBar (again, I recommend the way through homebrew:
brew tap homebrew/cask && brew cask install AnyBar)
- Grab a copy of my modification of Jollyjinx‚ ZFS Time Machine Script from my Github and put it in a folder of your choice
Setting it all up:
Familiarise yourself with zfs
Create a pool, decide if you want encryption, create the datasets that you would like. I recommend (for consistency’s sake to create them in a similar way as jollyjinx did – essentially recreate the path.
There should be enough guides, the man-page etc. that you can find via a simple search on DuckDuckGo or alike.
You don’t need to create the dataset sending targets – you can use znapzend to let them automatically be created for you.
Also, do yourself a favour and switch compression to lz4 on all of your datasets that might contain compressible data BEFORE moving data into it.
I usually moved data to ZFS datasets, then renamed the original location and set the mountpoint of the zfs dataset to the original location’s old name. That’s how I convinced Mail.app to use my ZFS dataset (as it is transparently mounted to ~/Library/Application Support/Mail).
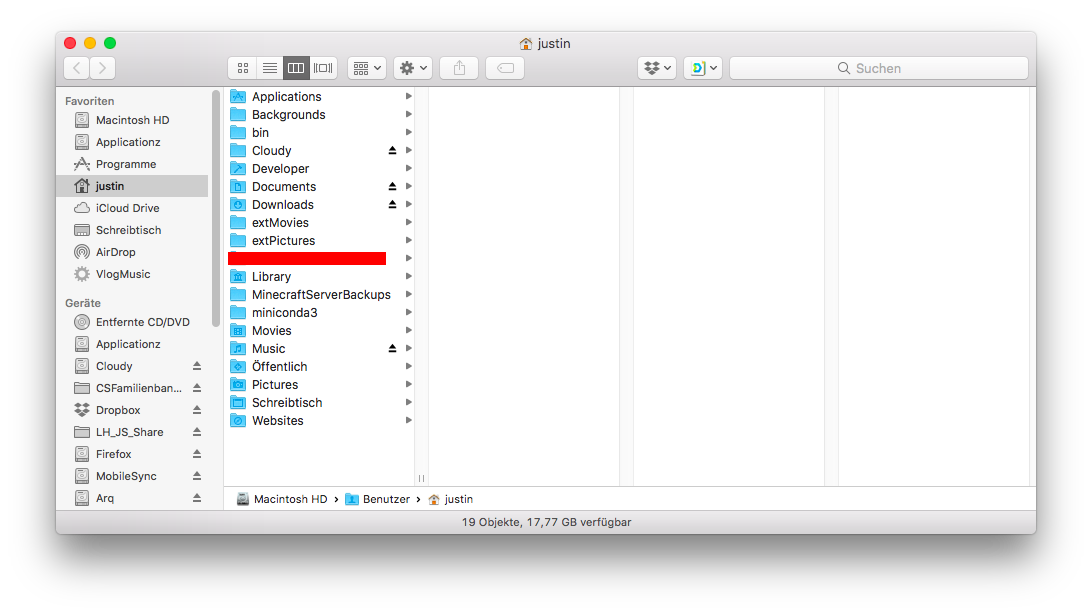
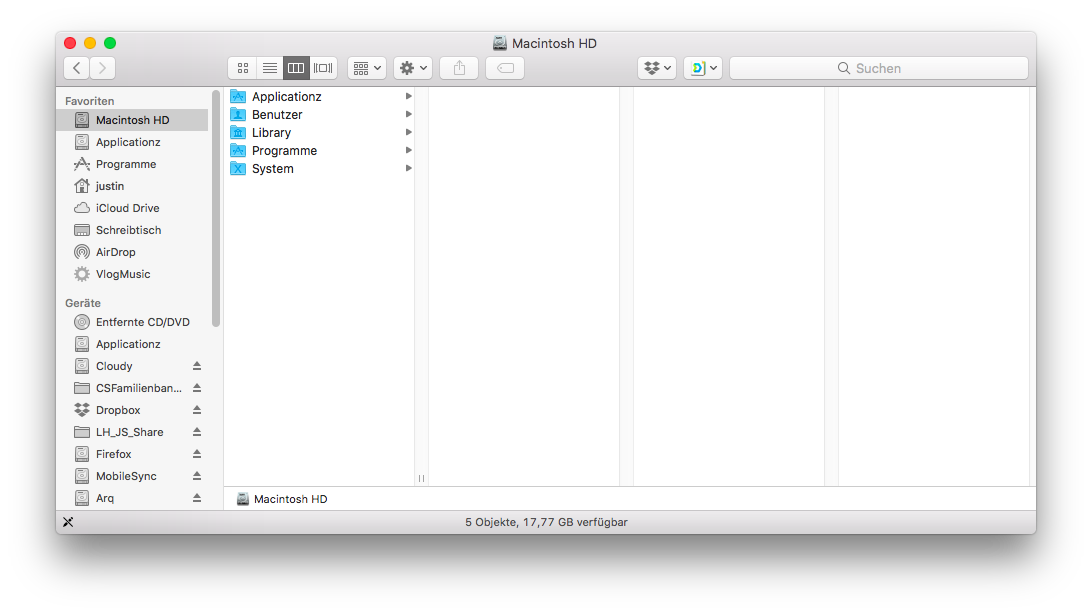
This is how it looks like in Finder then:
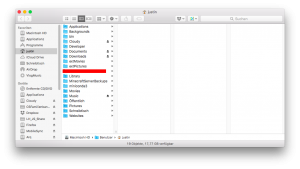
and I take the liberty to copy and paste the icons of folders onto my ZFS datasets. This is why my /Applicationz dataset mounted to /Applicationz has the app folder icon:

Set up the backup plans for the datasets with znapzendzetup
Use the man-page and the help to use znapzendzetup to create backup plans for your datasets. Mine (example of my documents folder) looks like this:
*** backup plan: zfsintern/Users/justin/Documents ***
dst_zfssnaps    = zfssnaps/zfsintern/Users/justin/Documents
dst_zfssnaps_plan= 3years=>9months,6months=>2months,2months=>1month,21days=>5days,7days=>4hours

enabled         = on
mbuffer         = off
mbuffer_size    = 1G
post_znap_cmd   = off
pre_znap_cmd    = off
recursive       = off
src             = zfsintern/Users/justin/Documents
src_plan        = 3days=>1hour,7days=>4hours,20days=>1day
tsformat        = %Y-%m-%d-%H%M%S
zend_delay      = 0

NOTE: if you have modified your configuration, send a HUP signal
(pkill -HUP znapzend) to your znapzend daemon for it to notice the change.
Important notice on your backup scheduling
Because I don’t trust znapzend, I run the separate checking script. This separate checking script checks a group of datasets and the important value is the minimum time between snapshots. If you let it check that snapshots should at most be 5 minutes old but create them every 20 minutes, you won’t be very happy most of the time. Furthermore, for datasets with quick changing data, keeping more of them will cost more space, so be warned.
Run the initial send and create target datasets
If you did create the target datasets, you can start the initial backup by running znapzend with –runonce (one round) and –features=recv,compressed (so not every target datasets gets mounted and the transfer is compressed):
sudo znapzend --runonce --features=recv --debug
And if you didn’t create the target datasets, add autoCreation so znapzend creates the datasets:
sudo znapzend --runonce --features=recv --debug --autoCreation
When this is finished, you should have now a first copy of your data on the target. Great!
Modify the checking scripts to accomodate for your specific backup schedule
When you downloaded my fork of jollyjinx’s zfs-time machine repo from github, you might have seen the checkbackup.perl and other files. Go to the bash folder and edit the checkBackups.sh file. In it you’ll see 3 lines right now. This is where you enter in the comma-separated list which datasets should be periodically checked for snapshot age. I modified the script to also contain the --warningGracePeriod which indiciates when it should warn you but not scream terror , the --anybarFailureColor parameter to indicate which color the AnyBar instance should switch to to indicate failure and the --anyBarPortNumber which addresses which exact AnyBar instance should be notified. As I have 3 pools, I have 3 AnyBar instances .
Almost done! Let’s configure the launchd part
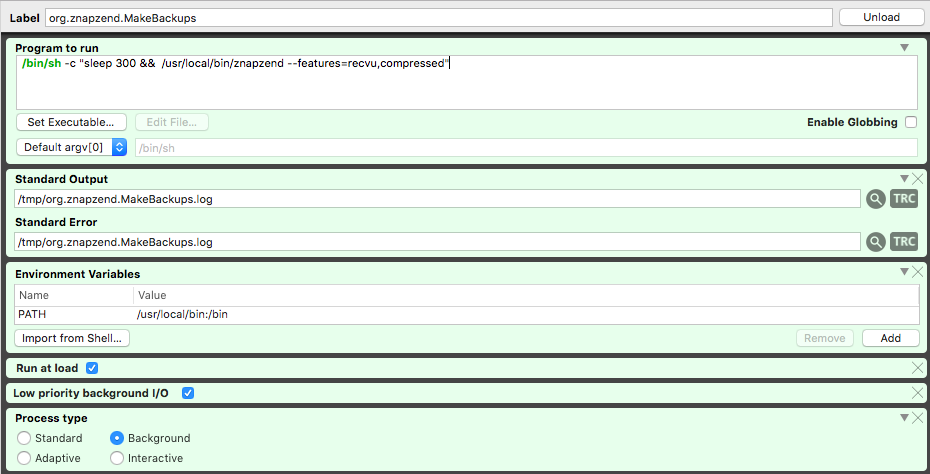
Head into LaunchControl (or do the equivalent on the command line – bless you) and head into „Global Deamons“. You’ll create the launchd daemon that starts znapzend there (and possibly also the daemons to make it easier to import/export):

The 300 second wait time is because the pools come available only after some time after boot and that is my way of starting zanpzend delayed after system boot.
Ok, so what about all the checking stuff etc?
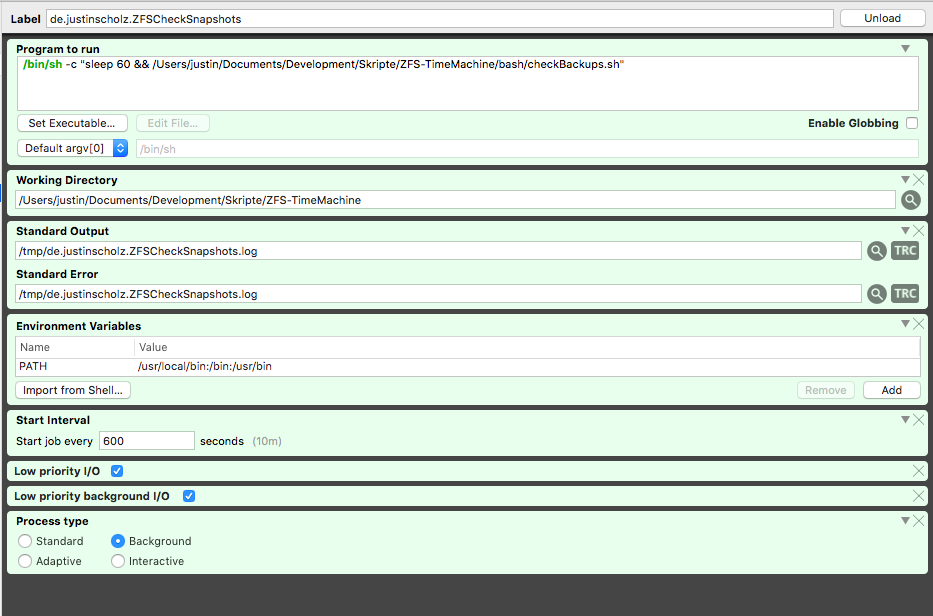
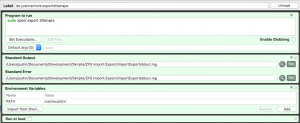
Head over to „User Agents“ and then create a new one. Mine looks like this:
 Same reason here for the delay is that the script itself is on ZFS and would cause problems with launchd. Important for you are to modify the paths. So the path to the bash script, the path to the working directory (the top level folder of your download of the zfs checking GitHub from me) and the standard output if you want to use the bonus. The „start job every“ box indicates that the refresh rate of your AnyBar dots is 10 minutes (and that all your pools will become active every 10 minutes…).
Last but not least, you should create another launchAgent that runs your bash script to launch AnyBar instances with the respective port numbers for you after system boot (the other bash script in the bash folder).
Now you should have a working backup regime. I hope this inspires, helps and at least was interesting to some one. Comments, suggestions for improvements are very welcome. You can comment here or interact with me on Twitter and IRC on freenode in the openzfs-osx channel (JMoVS).
Bonus: Easier export and import of pools
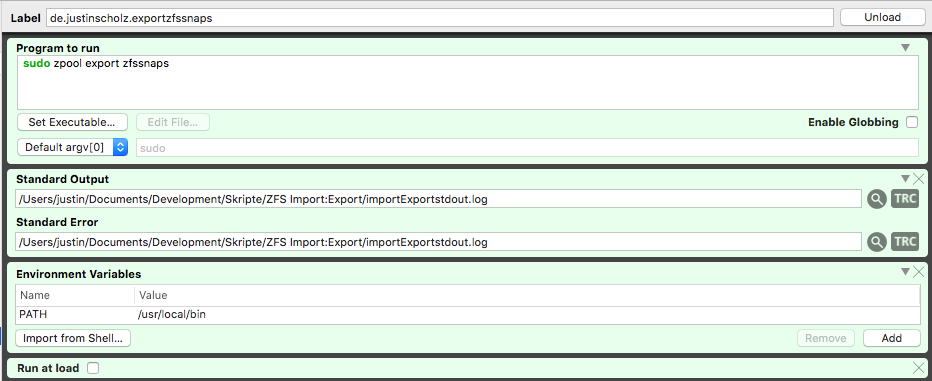
Because my setup requires me to constantly export and import two external pools, and I hate going to the terminal and enter my Master password on my sometimes partially broken keyboard, I came up with a hack to make it easier for me. I use LaunchControl’s QuickLaunch menulet to run the command as root to export/import the pools, eg:
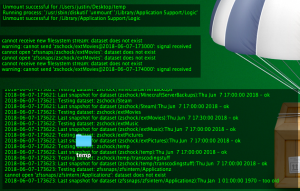
 And as I sometimes have problems with the photos dataset to unmount, I also have one that runs
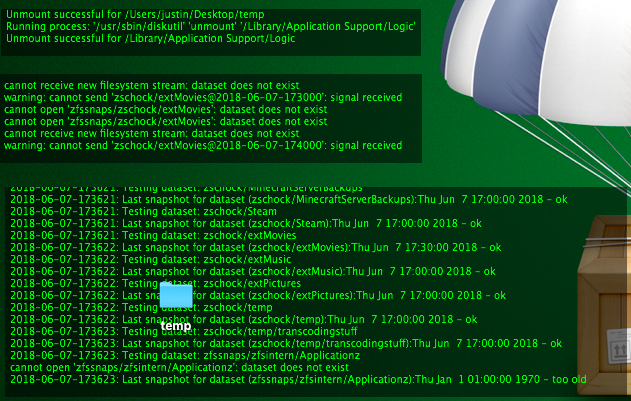
 sudo zfs unmount -f pool/photos. And because I don’t see the output of these commands directly, I use GeekTool to show me znapzend’s output, the import/Export output and the output of the checking scripts on my desktop (totally optional):
Known Issues/Inconveniences
- It is supposed to be fixed though I’m not sure – if you run znapzend and not all your pools are available, it will not check for their availability again until you relaunch znapzend
- Znapzend should ™ not delete local snapshots until it is connected to the target and able to make sure that it’s not getting into a situation where there are no common snapshots anymore to send an incremental snapshot (it’s advisable to create bookmarks once in a while on your source for that)
- It’s a big complicated setup but for me has been working for the last 2 years without major interruptions. Once you’ve set it up, it tends to work. To restore data, I either create a clone from the respective snapshot or make a complete rollback to the snapshot of the dataset
- To get Photos.app to work nicely with ZFS, you have to set com.apple.mimic_hfs to on, but then it works fine
- You should generally make sure that the last path name of your dataset (e.g. „extMusic“ in „pool/tank/extMusic“ is the same as the last component of your mountpoint, e.g. „/Volumes/extMusic“ or „/Users/justin/extMusic“
- If you create a new dataset, you usually have to get the permissions right – I do that by running
chown -R $user /path/to/dataset
- When I run
sudo zpool export $pool, I often get unmount errors for some nested datasets (nested by mountpoint) and my photos/video library. Running sudo zpool export $pool again usually solves that. If that doesn’t help though, I export the problematic dataset directly with sudo zfs unmount -f pool/dataset and with -f as it apparently needs force
- As it takes some time after system-boot for the main zpool to be imported, all the apps that are on zfs are manually started by a helper script in my case that I assembeld in Alfred. If you start apps that rely on data on zfs with user-login, you’re in for a bag of hurt
Acknowledgments:
- ilovezfs for the extensive help I got from him over the years with my zfs related issues and a proof-read of this article
- jollyjinx for getting me more into zfs and his excellent time-machine scripts that he open-sourced and that I modified
- the openzfs-osx IRC for taking up with me 😀
- of course the whole development team and contributors to OpenZFS and OpenZFS on Mac OS who make this all possible
- the respective open-source projects who make this possible as well
I’m looking forward to tweets at me @JMoVS or some discussion on Reddit about this article.
Small Update 16.06.18: I will publish smaller ZFS tricks/treats tagged with ZFS, so if we have a look at this page, you might find something useful there as well.